User-Defined Help

Contents
Viewing help when your application runs
To view a help tip when your application is running, do one of the following... •Click on the Windows "?" button at the top right corner of the window, and then click on the control that you want to see the tip for. So if you wanted to see the help for say an OK button, then you would click on the "?" button and then on the OK button. •Right click on the interesting control, and then choose "What's This'. •Give the interesting control the focus (by selecting it with the mouse, or tabbing to it) and then press F1.
After you've just started using the User-defined Help (UDH) there will obviously be no tips entered, and you will see a message saying there is no help for that control. To see how to add, and format the help, read the next section.
Editing Help Tips at runtime
To edit the tips at runtime, you need to bring up the tip (using Right-Click What's This, F1 or the Question Mark icon) and then use the following hot-keys to do the necessary editing:
Alt-E - to edit the tip
 Alt-C - to format or configure the tip Editing Tips
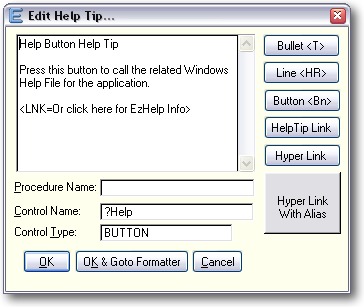
To get to the first screen press Alt-E (for Edit) while viewing a tip. You will see a regular looking memo box which contains the tip for the text. Apart from typing in the actual text, this is where you can also place buttons, hyperlinks, web links, highlighted text, horizontal lines etc. Each of these items is discussed below.
Bullets To place a bullet in the text use <T>. Note: You must have a space after the bullet (before entering text) otherwise you will get a ? Control not completed Line xx? message.
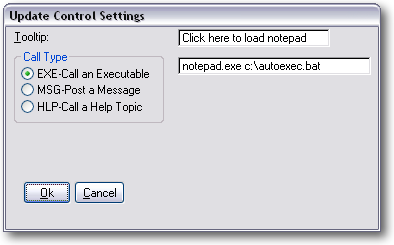
Buttons To place a button inside the text, put the following in the text. <B1> For the second button use <B2> etc. To configure the action of the button. Go to the Format/Configure window (Alt-C) and then left click on the button, then right click to see the menu, choose Properties and then configure what you would like the button to do.
For more options on how to configure button see the Configuration information.
Horizontal lines You can break up your tip using horizontal lines. To place a horizontal line in your tip, place the following on a line by itself <HR>
Internet Web Page links To place an active hyperlink to a web page place the page's URL inside sharp brackets, like this:
<www.abci-software.com> <http://www.abci-consultants.com> <C:\users\public\documents\myHtmlPage.htm>
Formatting or Configuring Tips
To get to the screen press Alt-C (for Control) while viewing the tip. You can then set the color and font of text, the actions for buttons, the destinations of links etc.
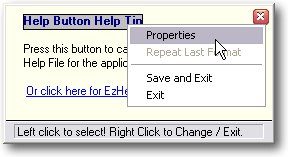
Important: To select the control you want to edit properties for, left click on the control so it becomes highlighted and then right click on the control to see the menu. When you have finished setting all the properties right click anywhere on the window to Save and Exit, or Cancel.
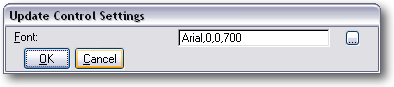
Highlighting & Formatting Text To format the text, select the text (left click) and then right-click to get the Popup menu. Choose Properties. You can then edit the font, color and style of the text by pressing the ... button.
You can also repeat the last format by choosing the Repeat Last Format option in the Popup menu.
You can also: Separate a piece of text from the surrounding text, so that it can be formatted later, place "pipes" around it. Pipes are vertical line characters (often of the backslash key on the keyboard). They look like this |. Only do this for highlighting single words or short phrases. To highlight an entire line, use the formatting method mentioned above.
So for example if you had the sentence "Click on the OK button to save the record", then you could prepare the OK button for highlighting by placing pipes around it, like this -
Click on the |OK| button to save the record
Note that placing pipes doesn't highlight the word, but it allows you to format that word separately from the text around it later.
Remember you can use the Windows Character Map to copy Wingdings characters and paste them into the Help Tip text. While formatting the control you can set the font to Wingdings and suddenly you will have all sorts of useful pictures!
Buttons To place a button inside the text, put the following in the text. <B1> For the second button use <B2> etc. To configure the action of the button. Go to the Format/Configure window (Alt-C) and then left click on the button, then right click to see the menu, choose Properties and then configure what you would like the button to do.
|
Online Internal Auditor Training Course ISO Management Systems +1 800 644 2056
|